Tena Sabi

Powered by

PSI Ethiopia
ORAQuick HIV Self-Test

How to Use
ORAQuick

Gum swab · Results in 20–40 min · Follow all 5 steps carefully.

Before You Start
Swab Your Gums
Insert Swab into the Vial
Wait 20–40 Minutes
Read Your Result

Guided Test Timer

Step-by-step with built-in 20-min timer

Watch the Tutorial First

ORAQuick HIV Self-Test — How to Use
ORAQuick

ORAQuick HIV Self-Test — How to Use

ORAQuick Official

ORAQuick Step-by-Step Walkthrough
ORAQuick

ORAQuick Step-by-Step Walkthrough

Full Tutorial

1

Before You Start

Do NOT eat, drink, smoke, chew gum, or use any oral hygiene products for at least 30 minutes before testing.

Wash hands thoroughly with soap and water
Check the expiry date printed on the foil pouch
Lay out all components: test device, developer vial, and swab

Testing within 30 minutes of eating or drinking can affect accuracy.

2

Swab Your Gums

Hold the white handle end. Do NOT touch the flat swab pad with your fingers.

Swipe the pad once along your UPPER gum line — from back to front (cheek side, not teeth)
Using the same swab, swipe your LOWER gum line once — from back to front
One full swipe per gum line is sufficient
Do NOT swab your teeth, tongue, or inner cheeks.
3

Insert Swab into the Vial

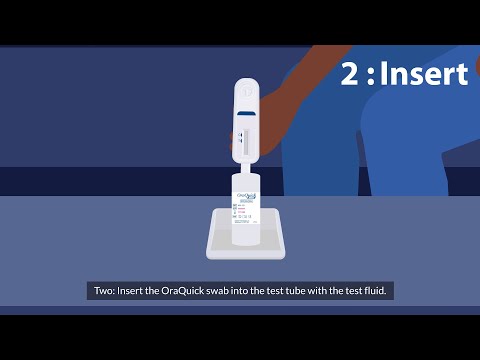
Remove the purple cap from the developer vial. Insert the swab paddle-end first, straight down into the vial.

Stand the vial upright — use the included stand or lean it against a wall
Do NOT lay the vial on its side after inserting the swab
The developer fluid will travel up the test strip on its own
Do not stir, shake, or move the vial after inserting the swab.
4

Wait 20–40 Minutes

Set a timer for 20 minutes and leave the vial completely undisturbed on a flat surface.

Do not move, tilt, or shake the vial while waiting
Do NOT read results before 20 minutes — the reaction is still developing
Do NOT read results after 40 minutes — result will no longer be valid

Reading outside the 20–40 minute window gives an unreliable result.

5

Read Your Result

Look at the result window on the test device. Check for lines next to "C" (Control) and "T" (Test).

Result Reference

1 line(C only)Negative

HIV not detected at this time.

2 lines(C and T)Reactive (Positive)

Even a faint T line is reactive. Seek confirmatory testing.

No lines(C absent)Invalid

Test did not work. Retest with a new kit.

Quick Reference

1
Before You Start
2
Swab Your Gums
3
Insert Swab into the Vial
4
Wait 20–40 Minutes
5
Read Your Result

Important: A reactive ORAQuick result is not a final HIV diagnosis. Visit a health facility for a confirmatory blood test.

Understand Your Results →